


As the second generation of SWAG family, SWAG 2 (or SWAG II) has many upgraded features that could incredibly enhance your vaping experience. The textured coating (made by a special formulated rubber) around the ergonomic body gives you a unique hand feeling that comforts the griping a lot, much lighter and more durable, it’s also anti-fingerprint and anti-scratch, so no more concerned about placing your device with the keys after vaping.
SWAG II adopts the powerful AXON Chip, which brings you the impressive PULSE mode, providing you more power with more satisfaction in every inhalation. Apart from the PULSE mode, AXON Chip can offer the power eco mode, the smart TC mode, and the DIY mode including super player style, giving all the options you can imagine for the vaping styles.
Go to the top, SWAG II equips the NRG PE tank with the GT4 meshed coil, which has the dual meshed cores to increase contact area with your e-juice, releasing denser, and more flavorful clouds. At the same time, the more spacious interface position can make SWAG II compatible with NRG tank of different capacities.
Before you get started with your new device, please take a view of the following setting instructions, which may significantly improve your vaping experience.
General Settings:
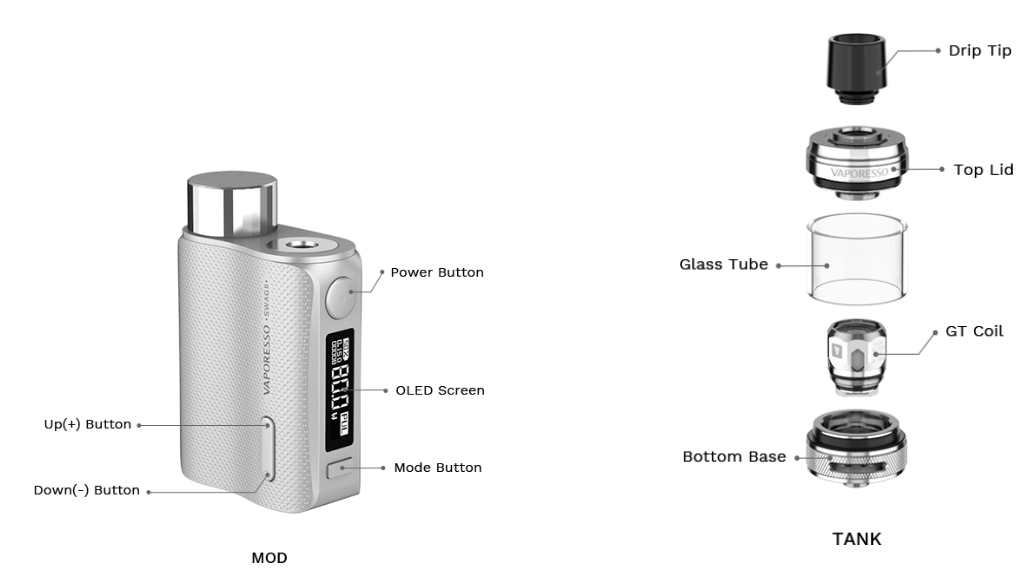
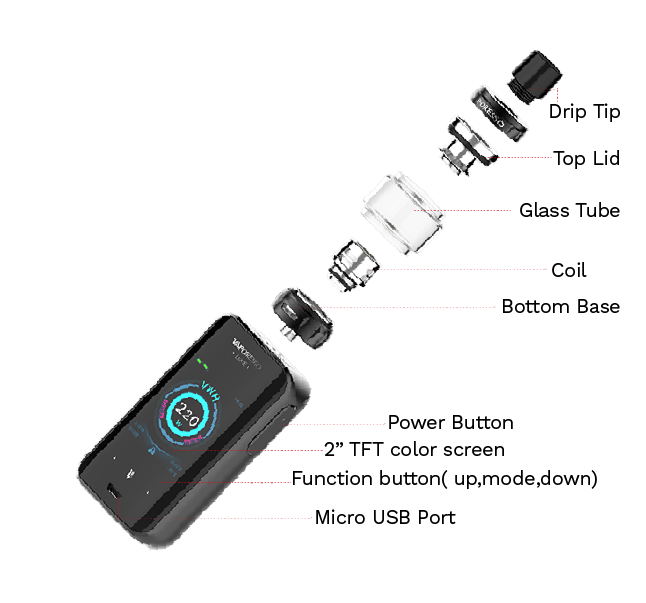
Replace the coil
-Remove the base of the tank
-Twist off the used coil on the base
-Install a new coil to the base
-Reattach the base to the tank
Install the Tank
Connect the tank to the MOD by screwing the 510 connectors. Make sure they are firmly connected.
Fill the E-liquid
- Regular Version
-Twist the top cap and fill the e-liquid through the slot.
-Lock the top cap back into place.
-Please wait for 5 minutes for the e-liquid to soak into the coil.
- Child-protection Version
-Pull out the drip tip and twist the top cap.
-Fill the e-liquid through the slot.
-Lock the top cap and drip tip back into place.
-Please wait for 5 minutes for the e-liquid
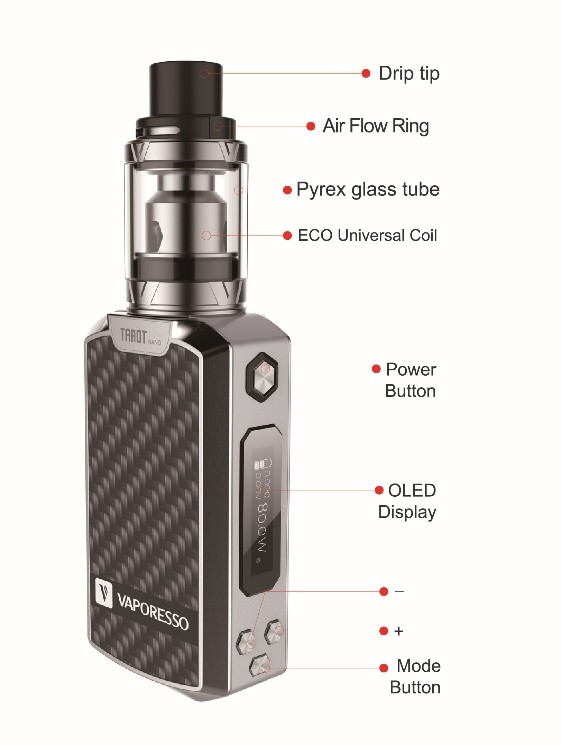
Adjust the Airflow
Twist the air-inlet ring on the bottom of the tank to adjust the airflow volume.
Start the Device
- Power on/off: Press the power button 5 times in 2s.
- Lock/unlock the buttons: Press the power button 3 times continuously to lock or unlock the “+” Button, “-” Button and Mode Button.
- Mode Button: Press the Mode Button 3 times continuously to start modes setting.
- The NEW LOAD and OLD LOAD will show on the screen after a tank is installed.
- In the SMART VW ON mode, press “+” (NEW LOAD) to enter the device recommended wattage; press “-” (OLD LOAD) to enter the wattage that you have already set.
- In the SMART VW OFF mode, to produce the best temperature control effect, please press “+” (NEW LOAD) when installing a new tank, and press “-” (OLD LOAD) when installing a used tank.
- Vaping: Press the power button to start to vape. For your safety, please do not vape for more than 10 seconds at a time.
Choose a Mode
*PUL: PULSE MODE (DEFAULT)
When the tank is installed, the device will enter the PULSE MODE automatically to boost flavor with large cloud continuously.
*ECO: POWER ECO MODE
When the battery power is less than 40%, the device will provide an option to enter the POWER ECO mode automatically.
*STC: SMART TEMPERATURE CONTROL MODE
When the temperature heating wire (SS/Ti/Ni) is detected, the device will provide an option to enter the STC (Smart TC) mode automatically.
*DIY: DIY MODE
You can choose traditional VW (H, N, S), VV, VT, CCW, BP (bypass) and SP (super player) modes in this section. When the coil resistance is extremely low, the device will provide an option to enter the SUPER PLAYER mode automatically.
*SET: SYSTEM SETTING
Including puff counter, brightness, flip screen, smart VW, auto eco on/off, default and version settings, the operating interface can be customized by yourself.
Options in DIY MODE
*VWS/VWN/VWH (Variable Wattage Mode)
VWH: high start-up speed
VWN: normal start-up speed
VWS: soft start-up speed
*VT-SS/VT-NI/VT-TI/VT-MI (Variable Temperature Control Mode)
The SS, NI and TI modes are only available for the Stainless Steel SUS316L, Nickel 200 and Titanium materials respectively. Choose the MI mode to make a customized setting when installing other heating wire materials.
*VV (Variable Voltage Mode)
Customize the voltage value according to your requirements.
*CCW (Customized Curve of Wattage Mode)
Press “+” and “-” buttons to customize your own curve of wattage output; move to the next bar with a quick press to the Power Button; Press the Mode Button to save and exit when the setting is done.
*BP (Bypass Mode)
A direct output voltage mode depends on the battery level; the supported coil resistance range is from 0.15W to 5W.
*SP (Super Player Mode)
The device supports broader resistance range from 0.03W to 5W, which is adaptive to the mainstream tanks such as RDA and RBA.
Protection Features
- Overtime Protection: The device will stop working if you vape for more than 10 seconds at a time, and “OVER TIME” will show on the screen.
- Resistance protection: When a low resistance is detected (except the SP Mode), resistance is detected, the device will stop working and show “CHECK ATOMIZER” on the screen.
- Short Circuit Protection: When a short circuit is detected, the device will stop firing and “SHORT ATOMIZER” will show on the screen.
- Low Voltage Protection: When the battery working voltage is extremely low, the device cannot be operated and “LOW BATTERY” will show on the screen.
- Overcharge Protection: The device will stop charging when it is fully charged.

COMMENTS